GA Product Variants Extension
Version 1.2.2_oc3This extension is compatible with OpenCart 3. It has been tested with OpenCart versions 3.0.0 - 3.0.3.6.
OpenCart 3.0.3.5 / 3.0.3.6
In OpenCart versions 3.0.3.5 and 3.0.3.6, a bug prevents modified templates from loading correctly. If you are using these versions of OpenCart, you need to perform the following fix:
- Save the contents of this link to modification.xml.
- In your OpenCart installation directory, replace system/modification.xml with the one you just downloaded.
- In OpenCart Administration, go to Extensions > Modifications and click the Refresh button.
Table of Contents
- 1. Introduction
- 2. Upgrading from a Previous Version
- 3. Installation
- 4. Using the Extension - Walkthrough
- 5. Setting Variant Data while Adding or Editing Products
- 6. Product Listing Visibility
- 7. Extension Settings
- 8. Styling Swatch Labels and Dropdowns for Individual Options
- 9. Optional Read: GA Product Variants Extension vs. Direct Option Assignment
- 10. Additional Notes
1. Introduction
The GA Product Variants extension for OpenCart lets you group products together and present them as variants of one another:
- Product variants are products that are grouped together in a Product Variant Group.
- Within a Product Variant Group, options and option values (feature provided by OpenCart) are used to identify a product.
In this guide, you will learn how to group products together and assign options and option values to identify each product in the group.
A product can only belong to one Product Variant Group at any given time.
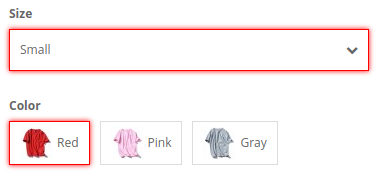
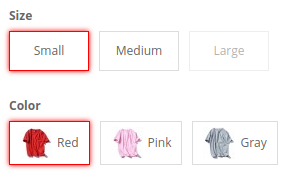
On the product page, the extension displays a set of swatch labels or dropdowns for the product variant group of which the viewed product is a member (of course, it won't show anything if the product being viewed does not have any variants). The labels and dropdown items represent the option values used for identifying products in the group. The following screenshot illustrates this:
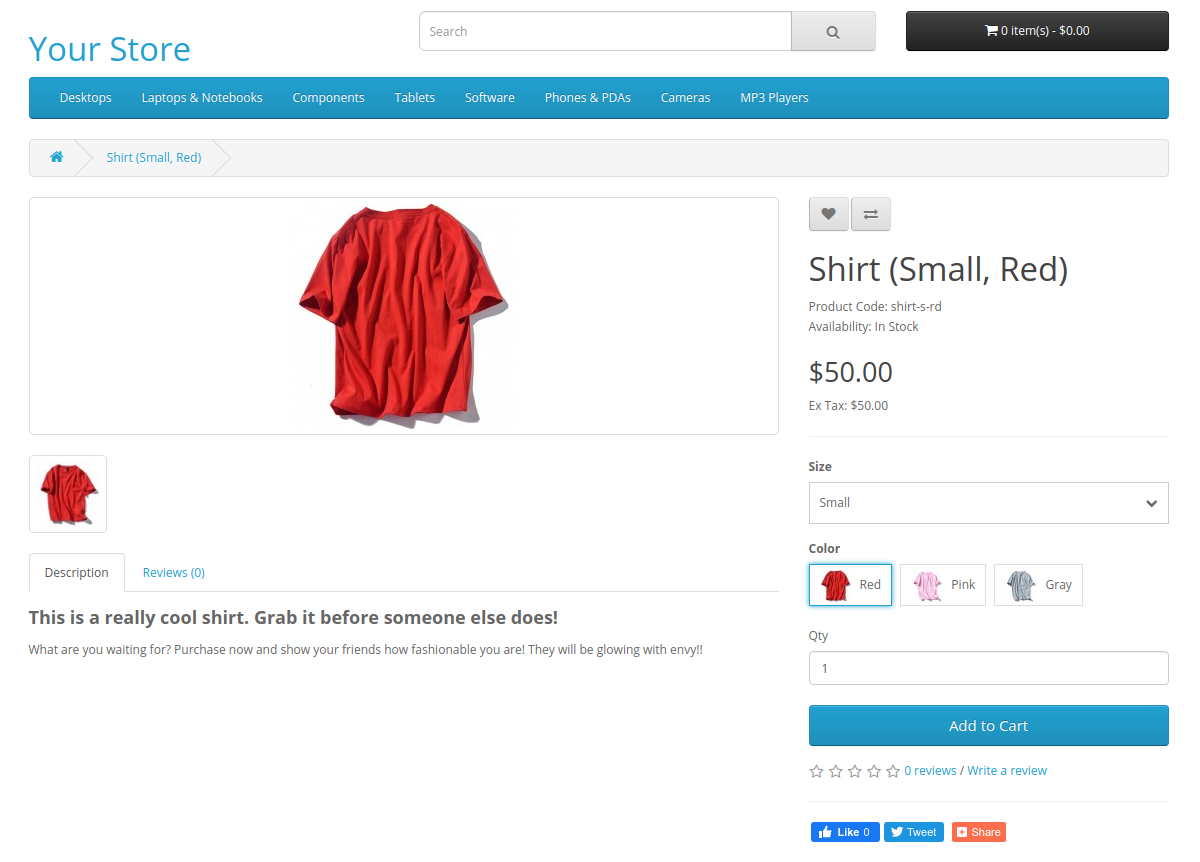
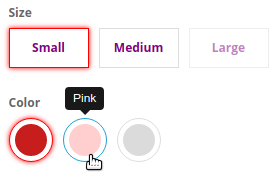
In this screenshot, the product being viewed, Shirt (Small, Red), represents the Small + Red variant. This is shown by the highlighted Red swatch label and the selected Small dropdown item. Clicking on the Pink swatch label will bring the customer to the product page for Shirt (Small, Pink); clicking on the dropdown will bring up a list of sizes:
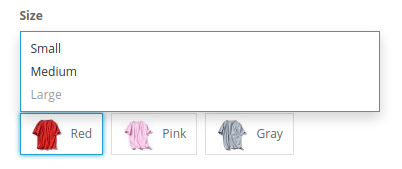
Note the grayed-out item for Large. This means that, for the selected Red color, there is no shirt with size Large. Clicking the item will bring you to the closest-matching variant. This behavior is similar to what you would see in Amazon product listings.
2. Upgrading from a Previous Version
Although the upgrade process described in this section is generally safe, it is always a good idea to perform a site-wide backup first. You can do this by going to System > Maintenance > Backup / Restore in OpenCart Administration.
You are also strongly advised to put your site in Maintenance Mode. Having customers browsing your site could interfere with the upgrade process and vice versa. You can enable Maintenance Mode by going to System > Settings and editing your "Default" store (the option is under the Server tab).
If you already have a previous version of the extension installed, you can upgrade it as follows:
Step 1: Decide whether to preserve existing data
- Go to Catalog > Products > Product Variants in OpenCart Administration. Click the Settings button.
- If you want to preserve existing data, ensure Preserve Data on Uninstall is set to Yes. Otherwise, set it to No.
- If you have chosen to preserve existing data, click the button under the Cache setting to clear the product variants cache. If you have multiple stores, click the Clear All button.
- Click the Save button.
Step 2: Uninstall current version of the extension
- Go to Extensions > Extensions, choose Modules as the extension type, and click the Uninstall button for the Product Variants entry.
- Go to Extensions > Installer, locate the installation package for the existing version of the extension (e.g. GAProductVariants_1.1.0_oc3.ocmod.zip) and click the Uninstall button.
- If you have installed any additional packages related to the extension (e.g. a switch handler for a particular theme), you should uninstall them too.
Step 3: Install current version of the extension
Follow steps 1-4 in the next section to install the current version. Remember to refresh the Modifications and Theme caches after installation.
3. Installation
Follow these steps to install the extension:
Step 1: Install OCMOD file
Go to Extensions > Installer in OpenCart Administration. Upload the extension's OCMOD zip file: GAProductVariants_1.2.2_oc3.ocmod.zip and wait for the success message.
Step 2: Enable extension
Go to Extensions > Extensions, choose Modules as the extension type, and click the Install button for the Product Variants entry.
Step 3: Refresh Modifications cache
Go to Extensions > Modifications and click the Refresh button.
Step 4: Refresh Theme cache (OpenCart versions 3.0.1.1 and above)
In Dashboard, click the button and refresh the Theme cache ( button).
Step 5: Set permissions
Go to System > Users > User Groups and edit the Administrator group (assuming you are going to use the extension as a member of this group). We need to ensure that the Access and Modify permissions are checked for extension/module/ga_product_variant.
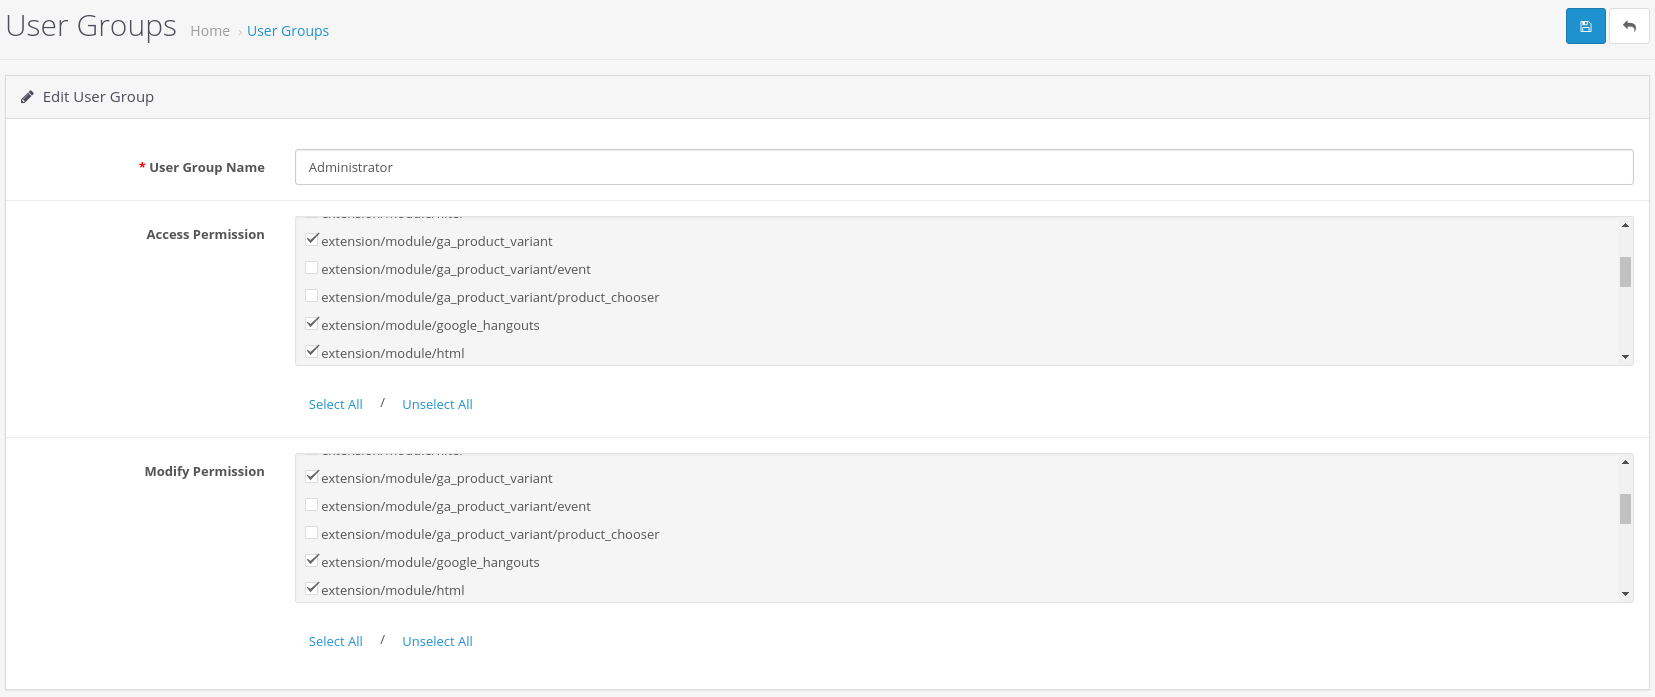
You may have noticed the other entries extension/module/ga_product_variant/event and extension/module/ga_product_variant/product_chooser. You don't have to check them for the extension to work. Just checking extension/module/ga_product_variant will suffice.
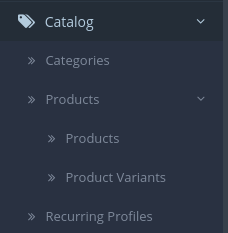
Refresh the page after performing the above steps. If installation is successful, you will see a submenu under Catalog > Products:
4. Using the Extension - Walkthrough
Suppose we are selling shirts that have the following sizes and colors:
| Shirt Variations (Size + Color) | ||
| Small + Red | Small + Pink | Small + Gray |
| Medium + Red | Medium + Pink | |
| Large + Pink | Large + Gray | |
We shall see how we can use the GA Product Variants extension to present these variations to the customer.
Step 1: Create Options and Option Values
Our shirts have the common characteristics Size and Color, of which Size can be Small, Medium or Large and Color can be Red, Pink or Gray. Since options and option values are used to identify a product variant, we would have to create them first.
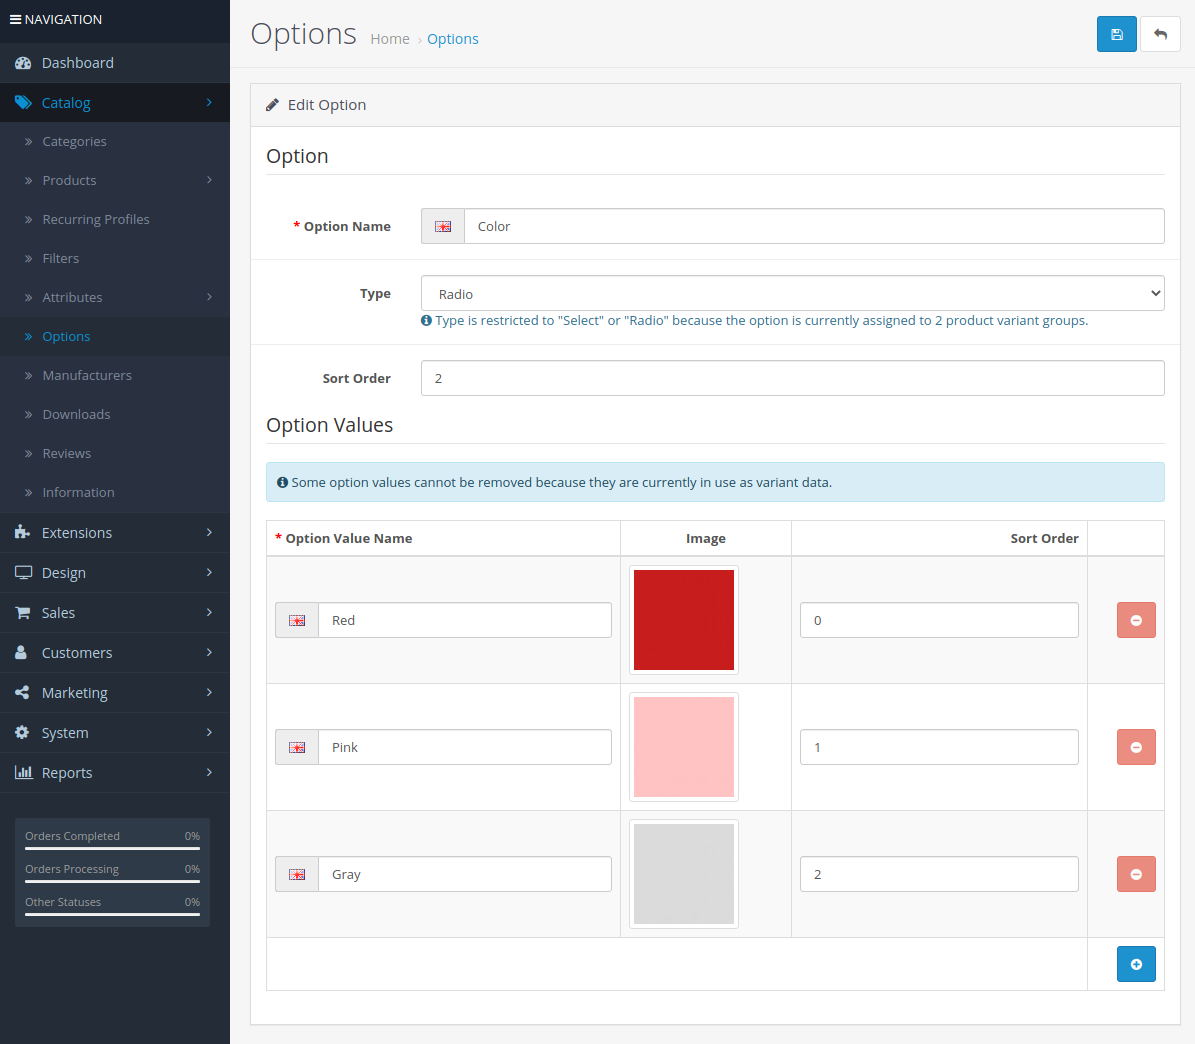
In OpenCart Administration, go to Catalog > Options and create the following options and option Values:
| Option | Option Type | Option Values |
| Size | Radio or Select | Small, Medium, Large |
| Color | Radio or Select | Red, Pink, Gray |
Note that you can only choose Radio or Select for option type. Other types will be ignored by the extension.
Step 2: Create Products
We have seven shirt variants, so we need to create seven products — one for each variant.
Go to Catalog > Products > Products and create the following products (you can find the product images in the doc/product_images directory):
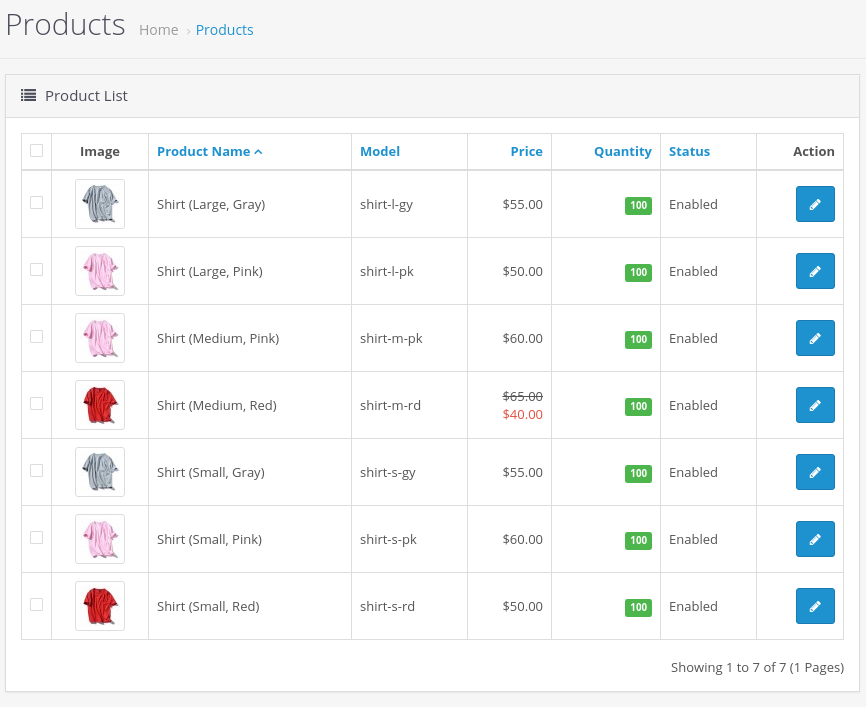
Each product can have its own data separate from other products. In the above screenshot, for example, we have shirts that have different models and prices.
To speed up the process, you can create one product first, then duplicate it and make changes to the duplicated product.
While creating products, you may have noticed a Product Variant tab on the product form. You can ignore it for now — we will cover it in the next section.
Step 3: Create and Populate Product Variant Group
We have created the products and options we need. Now it's time to use the extension to group the products together and assign the options and option values for them.
Go to Catalog > Products > Product Variants:
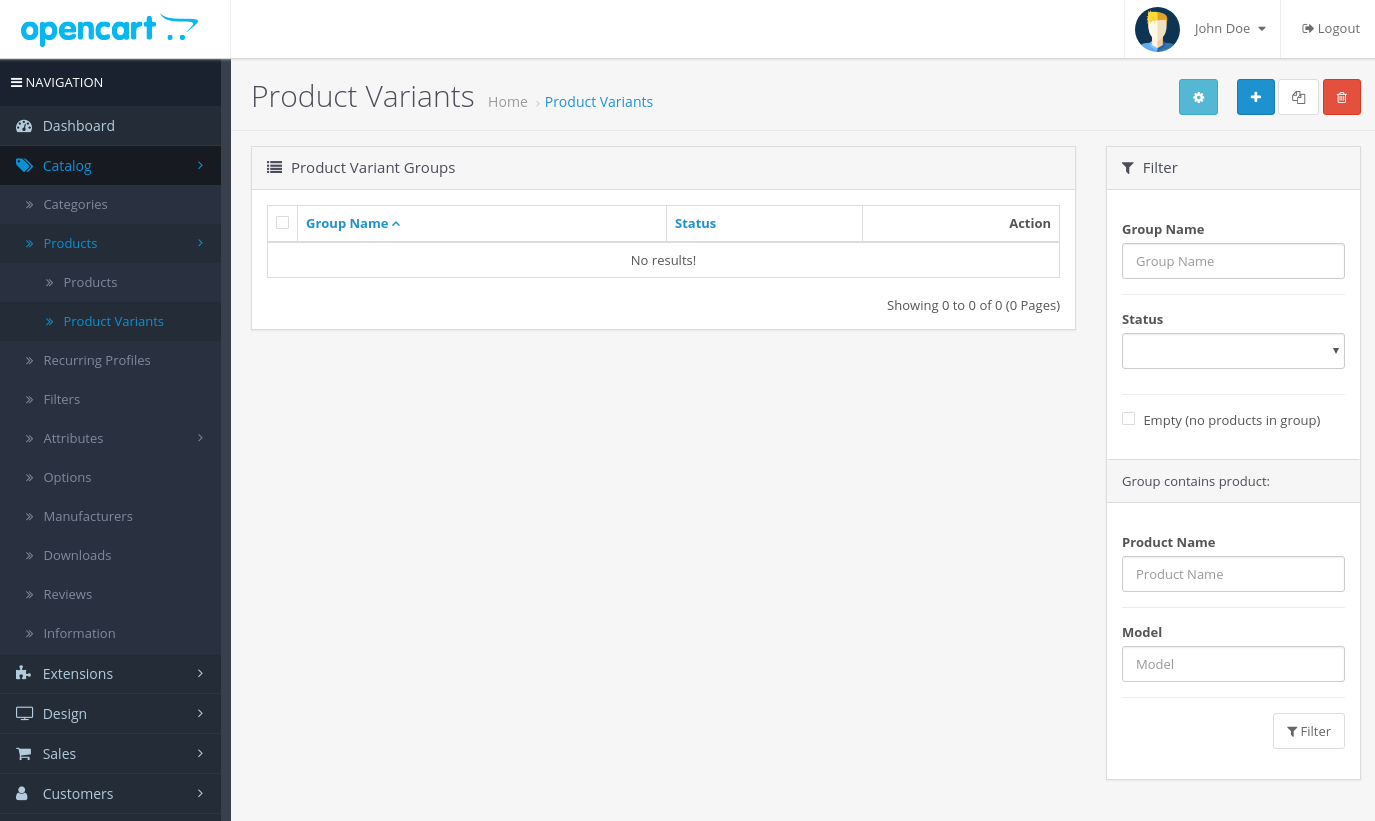
The table lists the Product Variant Groups. Let's proceed with creating our first one.
Step 3.1: Prepare the Product Variant Group
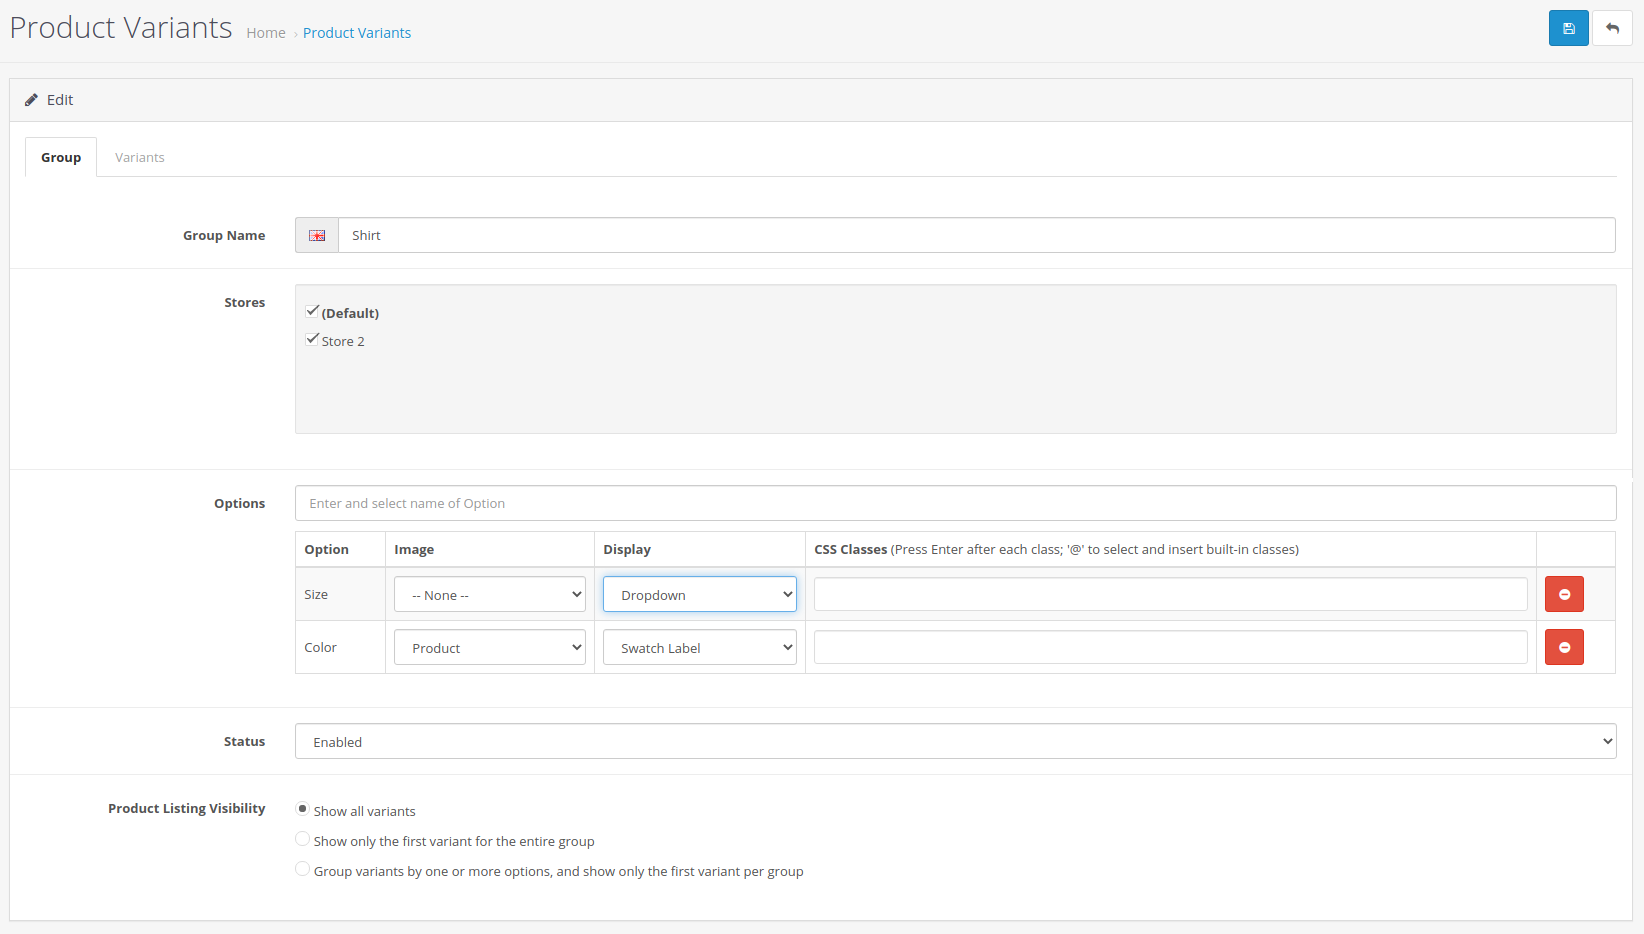
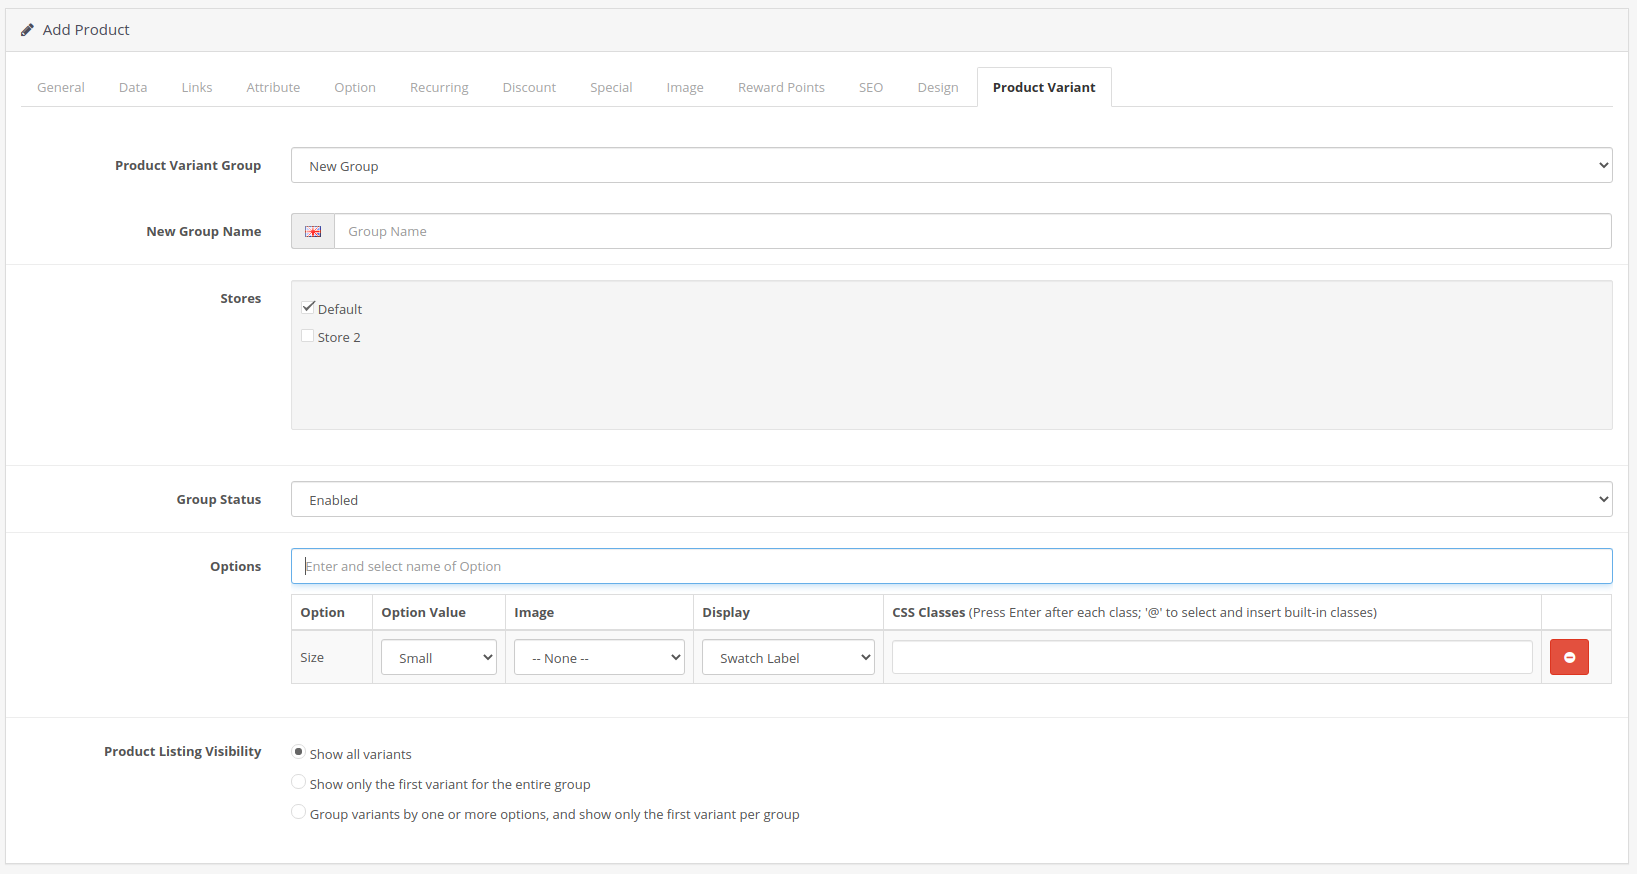
Click the Add New button to display the Add Product Variant Group page. In the Group tab of the form, fill in the details as follows:
Explanation of the input fields:
| Input Field | Explanation |
| Group Name | Name of the Product Variant Group. It is recommended that you choose a name that is representative of all the products in the group. |
| Stores | If you have multiple stores, select those that you want the extension to apply. |
| Options |
In the Autocomplete field, enter the name and select the option you would like to assign to the Product Variant Group — Size and Color in this example.
You will note that, in the screenshot shown in the Introduction, an image is displayed next to the option values for Color. You can specify the type of image to be displayed (in this example, we choose Product for the Color option):
|
| Status | Sets the status of the Product Variant Group. If Disabled, the extension will not be applied for products in the group. |
| Product Listing Visibility |
Specifies how variants will be displayed in the product listings of your store.
We shall go through this in detail in Section 6. For now, we shall leave the Show all variants option selected. |
Note that, at this point, you can click the Save button to create an empty Product Variant Group, which you can later edit and add products to it. In this example, however, we will add products at the same time as creating the group.
Step 3.2: Add Products to Group and Assign Option Values
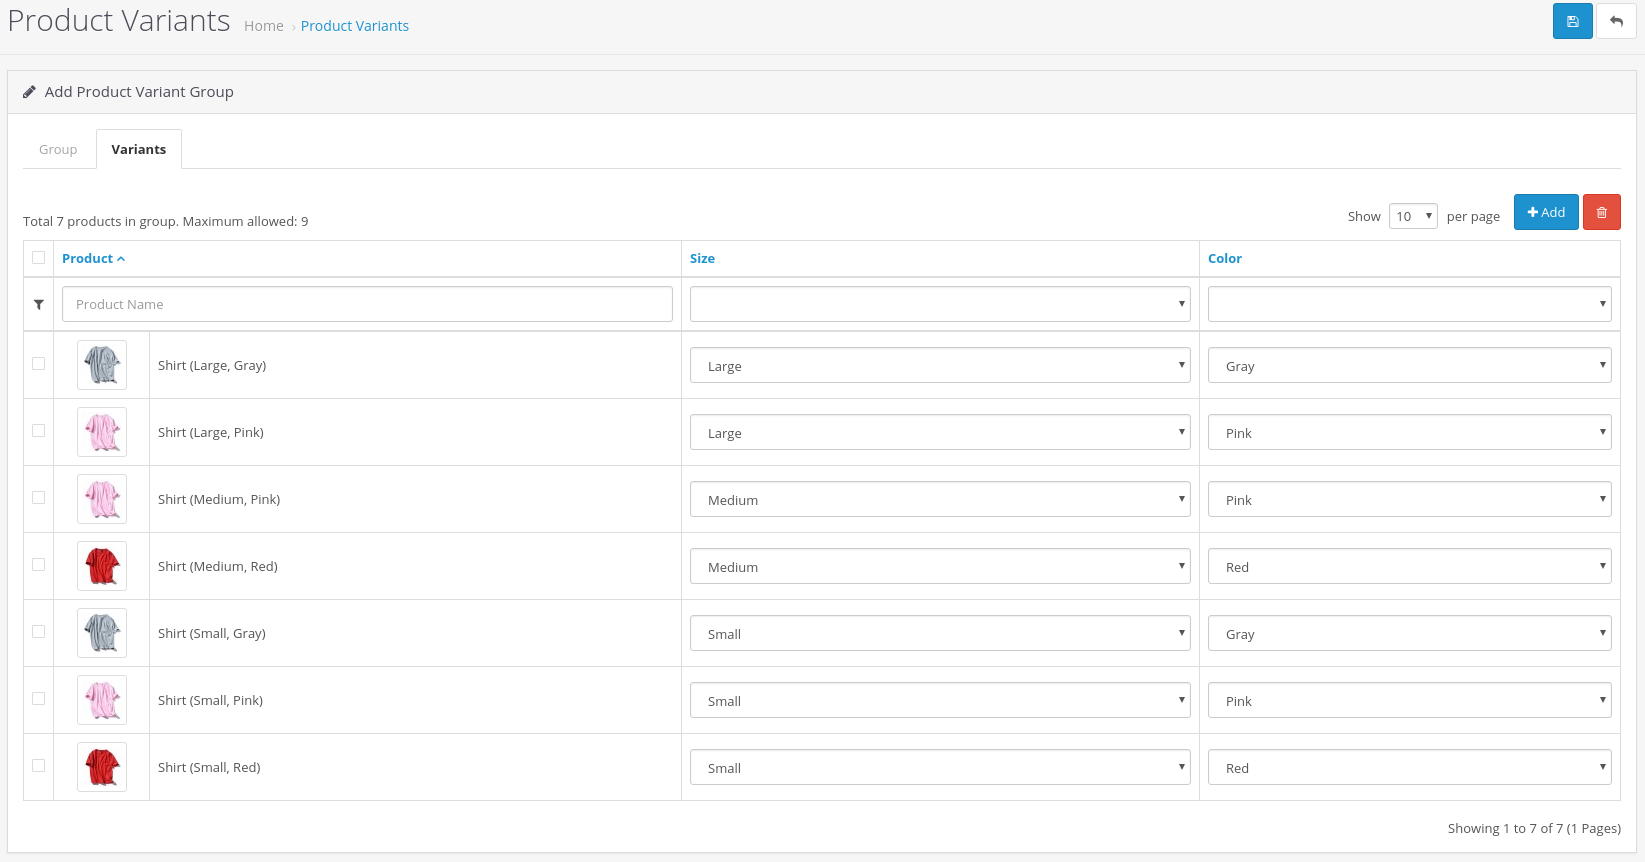
Go to the Variants tab:
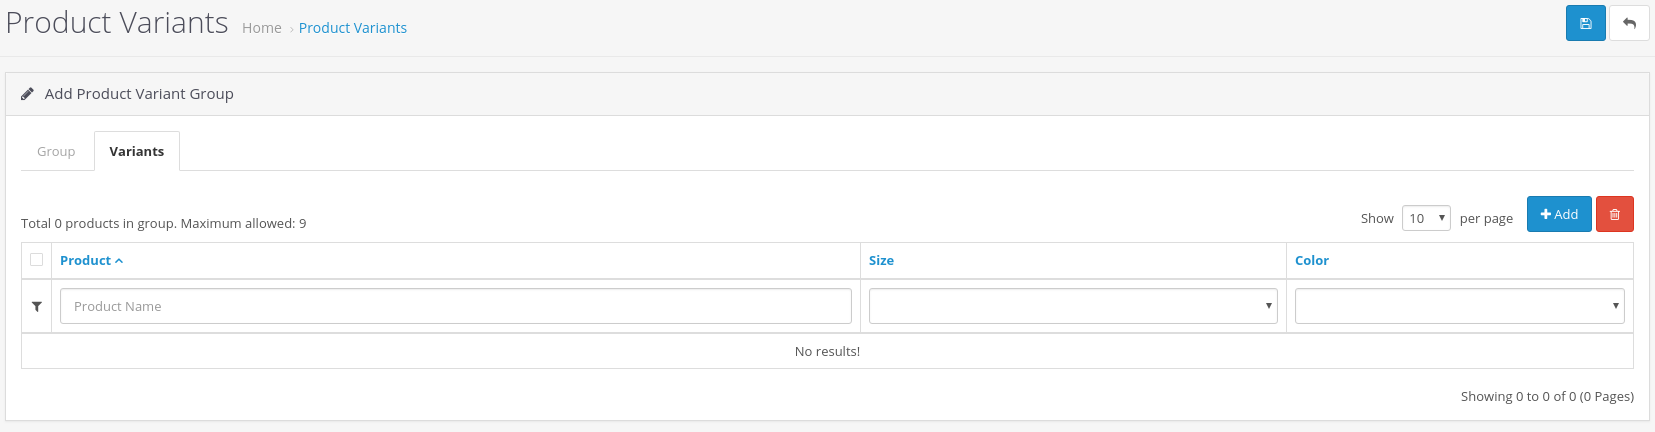
The table contains a Product column as well as one column for each of the options chosen in the Group tab.
Click the Add button to bring up the Add Products to Group dialog. Select the checkboxes next to the shirt products we have created in Step 2 (use the Filter if necessary to locate them):
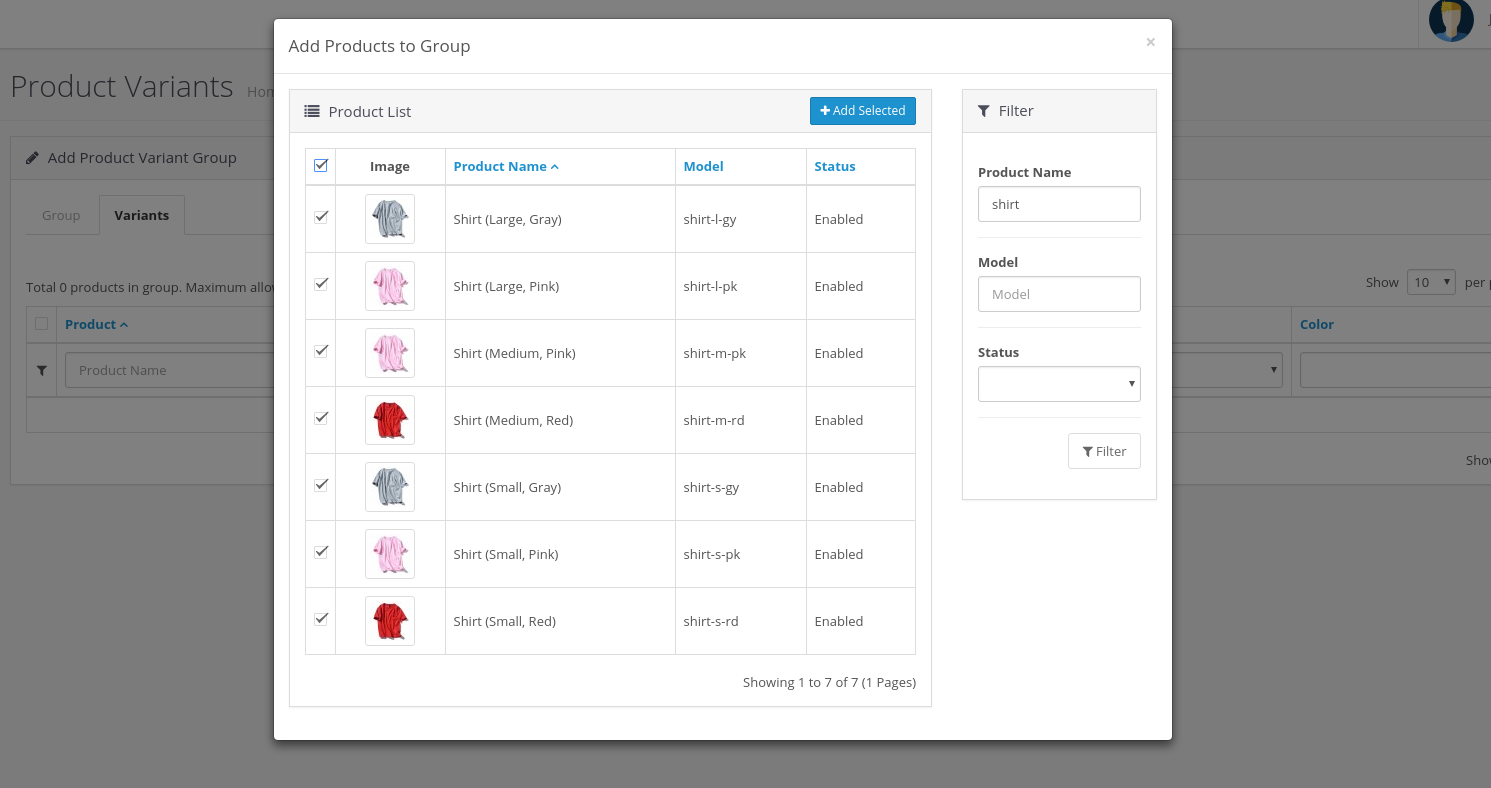
Click the Add Selected button to add them to the Product Variant Goup, then close the dialog.
The maximum number of products allowed in a Product Variant Group is determined by the total possible option value combinations. In this example, the Size and Color options each have 3 option values, so the maximum would be 3 x 3 = 9.
You will see that our shirt products have been added to the table. Finally, we will select the relevant option values for each product:
Click the Save button. You will be brought back to the Product Variants page. Note the newly-added Product Variant Group:
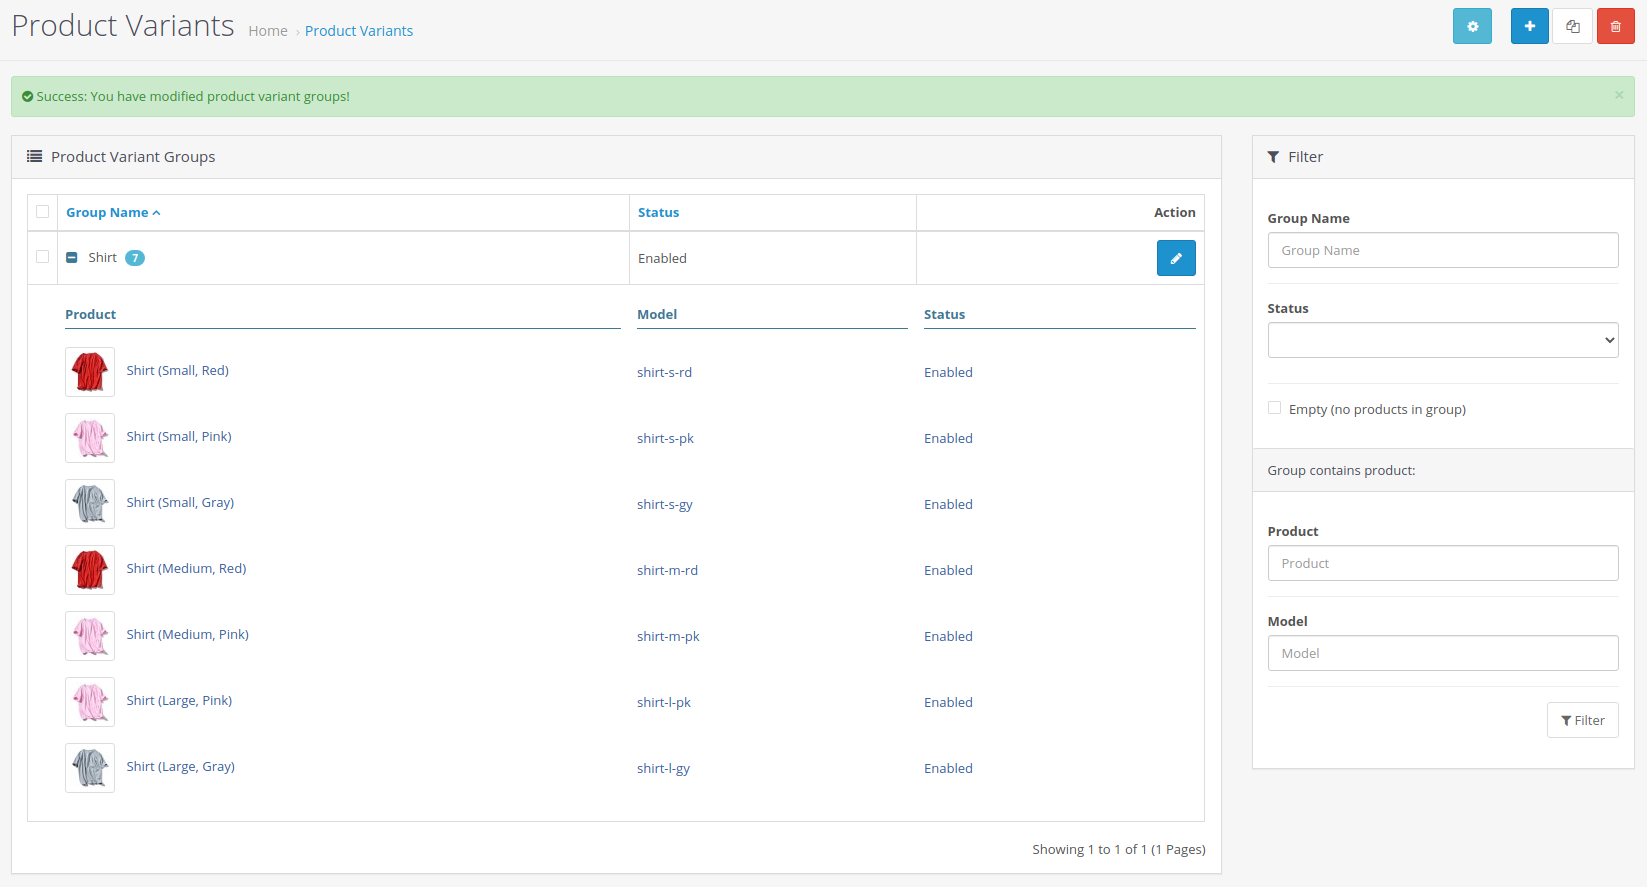
That's it — we have grouped our shirts together with the GA Product Variants extension! Let's go to the store and check them out.
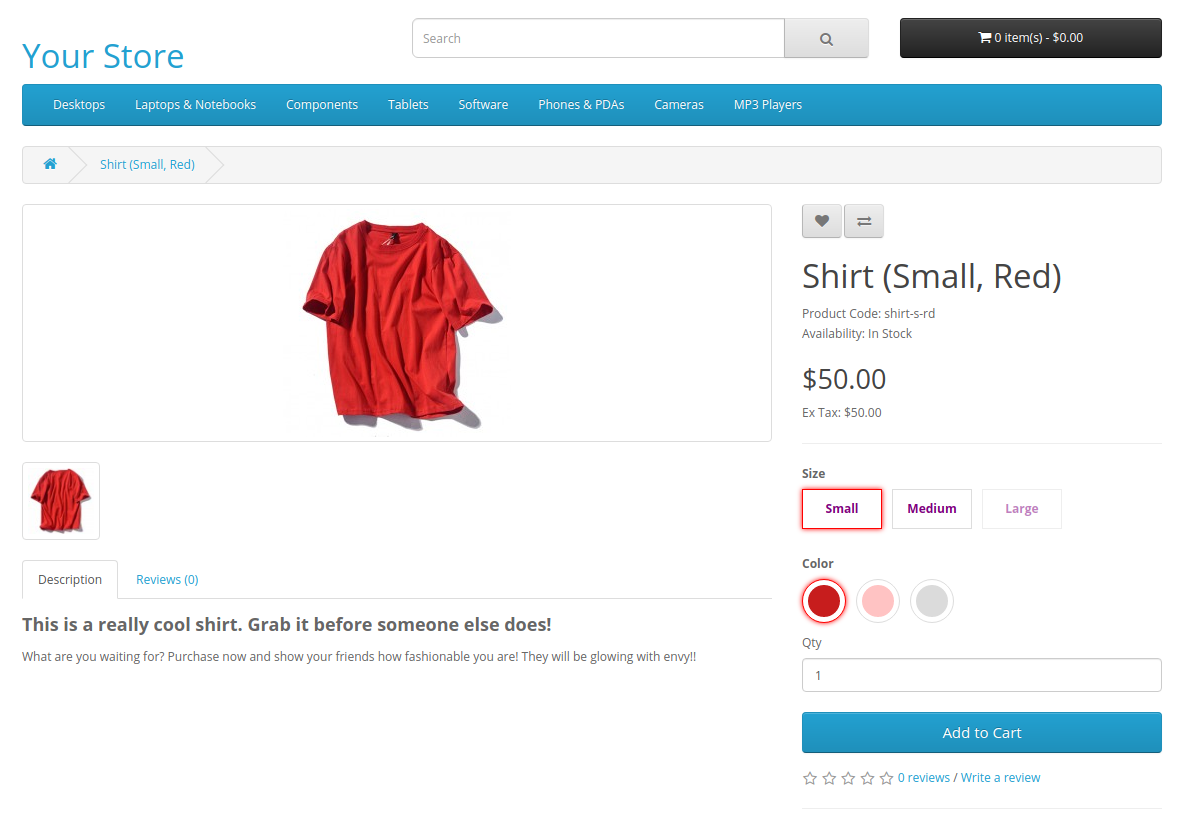
Verify the Results
In your store, visit the product page for Shirt (Small, Red):
This is the same screenshot shown in the Introduction. The option values we have assigned to our shirts in step 3.2 are displayed under their respective options. The option values for Color are displayed as swatch labels, whereas those for Size are presented in a dropdown. If you open the dropdown and select Medium, you will be brought to the product page for the matching Shirt (Medium, Red).
Note that, in the Size dropdown, the item for Large is grayed out. This is because we don't have a shirt for the Large + Red variation. If you click on the label, the extension will find the closest-matching product and direct you to that. In this case, that would be the shirt that matches size Large and color Pink.
5. Setting Variant Information while Adding or Editing Products
Sometimes you might want to set variant information while you are adding or editing a product. You can do so with the Product Variant tab of the Product Form:

The Product Variant Group field can be one of following:
| Value | Explanation |
| None |
Specifies that the product will not be a variant and will not be added to any Product Variant Group. If the product already belongs to a group, it will be removed from it.
There are no fields to complete when this value is selected. |
| Existing Group |
The product will be added to an existing Product Variant Group (if it does not already belong to the group). If you choose this option, you are required to enter and select the name of the group in the Existing Group Name autocomplete field (e.g. Shirt): 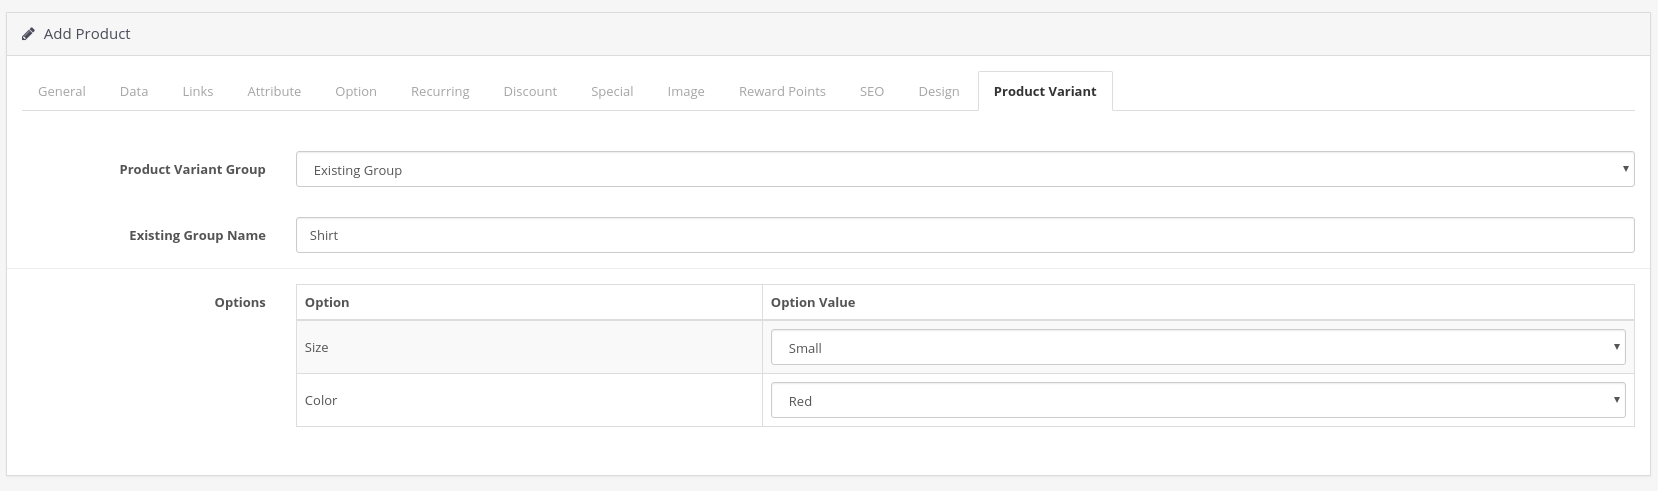
The options that have been assigned to the group when it was created will be listed, and you are required to select the option values that would identify the product in the group. |
| New Group |
A Product Variant Group will be created, and the product will be added to the new group.
Refer to Step 3.1 Prepare the Product Variant Group in the previous section for an explanation of the input fields. After you have assigned option(s) to the group, you are required to select the option value(s) that would identify the product in the new group. |
6. Product Listing Visibility
When creating our Product Variant Group for the shirt product, we left the Show all variants option selected for the Product Listing Visibility field. If we visit our store, we will see something like this in the product listings:
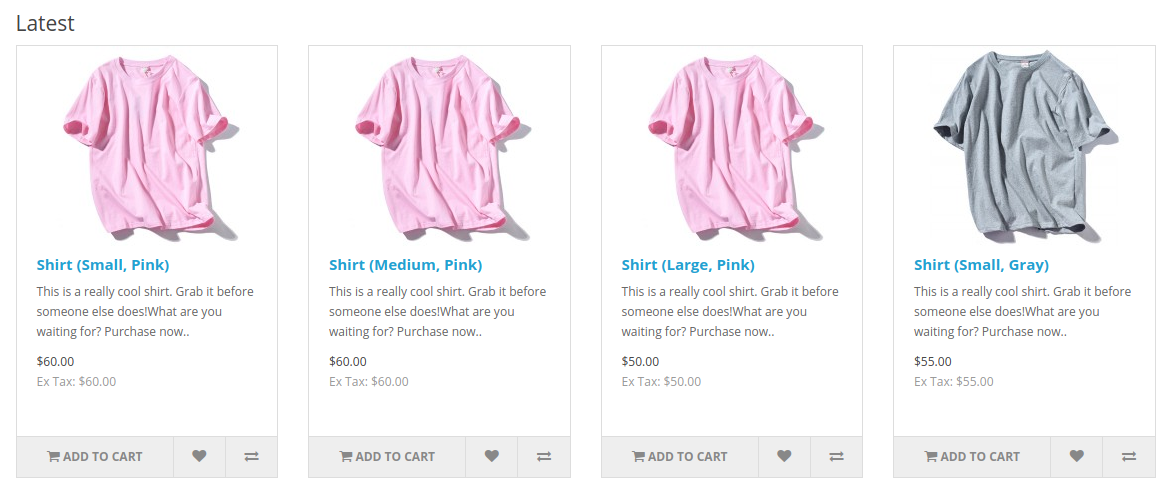
As you can see, every shirt variant is shown individually. But what if we want to show only a single item for all the variants, or three items for the variants grouped by the Red, Pink and Gray colors respectively? To do this, go back to Catalog > Products > Product Variants and edit the Shirt variant group ( button), then configure the Product Listing Visibility field as follows:
(i) To Show Single Item for All Variants
Choose Show only the first variant for the entire group. This will bring up additional input fields:
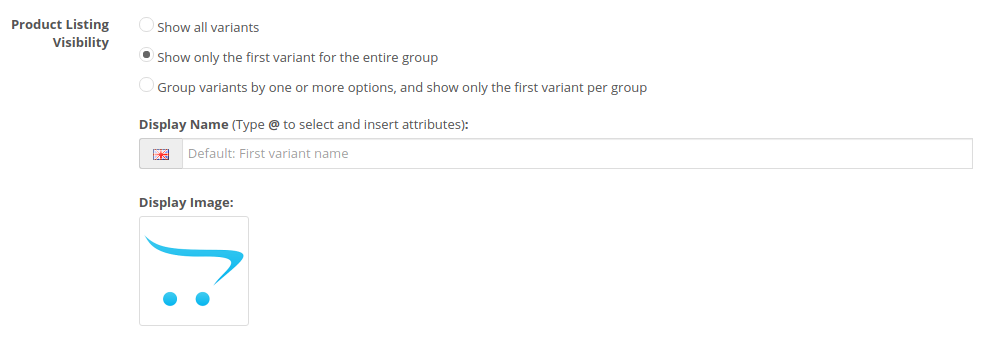
Explanation of the input fields:
| Input Field | Explanation |
| Display Name | The name that will be displayed in the product listing. If left empty, the name of the first variant will be used.
Typing @ will bring up a list of attributes you can insert into the display name. Note that Option Value-type attributes relate to the first variant in the Product Variant Group. |
| Display Image | The image that will be displayed in the product listing. If left empty, the product image of the first variant will be used. |
For our example, we would configure the input fields as follows:

- The Display Name will just be the name of the Product Variant Group. You would type @ and select Product Variant Group Name from the list of attributes that appears.
- For Display Image, we choose one that represents all the shirt variants.
Now, when you visit our store, the product listings should appear like this:
Clicking the Shirt item in the product listing will bring you to the product page for the first Shirt variant.
(ii) To Show Items for Variants Grouped By Color
Choose Group variants by one or more options, and show only the first variant per group. This will bring up additional input fields:
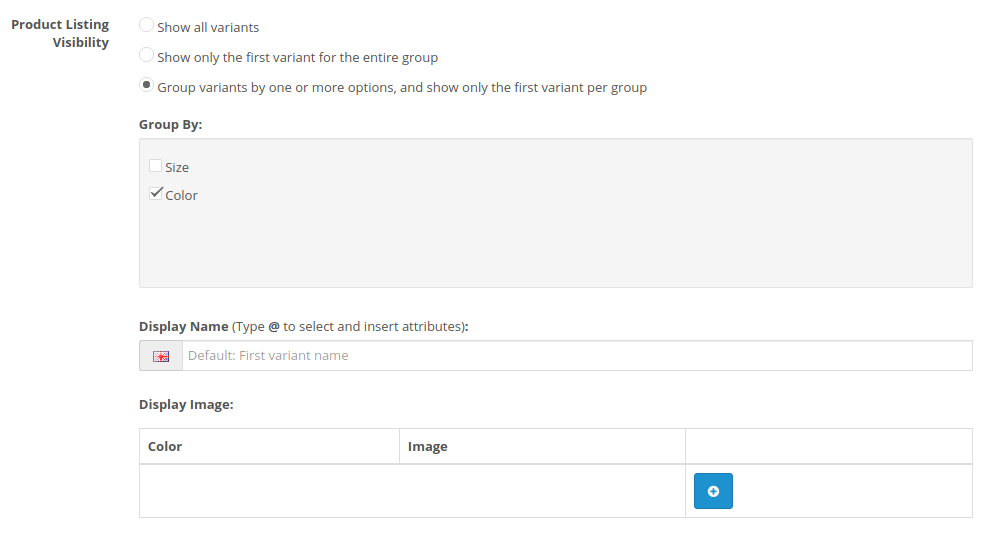
Explanation of the input fields:
| Input Field | Explanation |
| Group By | Specifies the options by which variants will be grouped. Only options assigned to the Product Variant Group will be available for selection.
You must select at least one option. Once you do that, as shown in the above screenshot, the Display Image field will appear below. |
| Display Name | The name that will be displayed in the product listing. If left empty, the name of the first variant will be used.
Typing @ will bring up a list of attributes you can insert into the display name. Note that, given a group of variants, the Option Value-type attributes relate to the first variant in the group. |
| Display Image | This field consists of one or more entries, with each entry indicating an option value (or option values if grouped by more than one option) and an image. The extension will match the option value(s) for each group of variants against those specified in the list of entries. If a match is found, the image specified in the matching entry will be displayed. If a match is not found, or no image has been specified in a matching entry, then the product image of the first variant in the group will be used.
Click the button to add an entry; to remove. |
For our example, we would configure the input fields as follows:
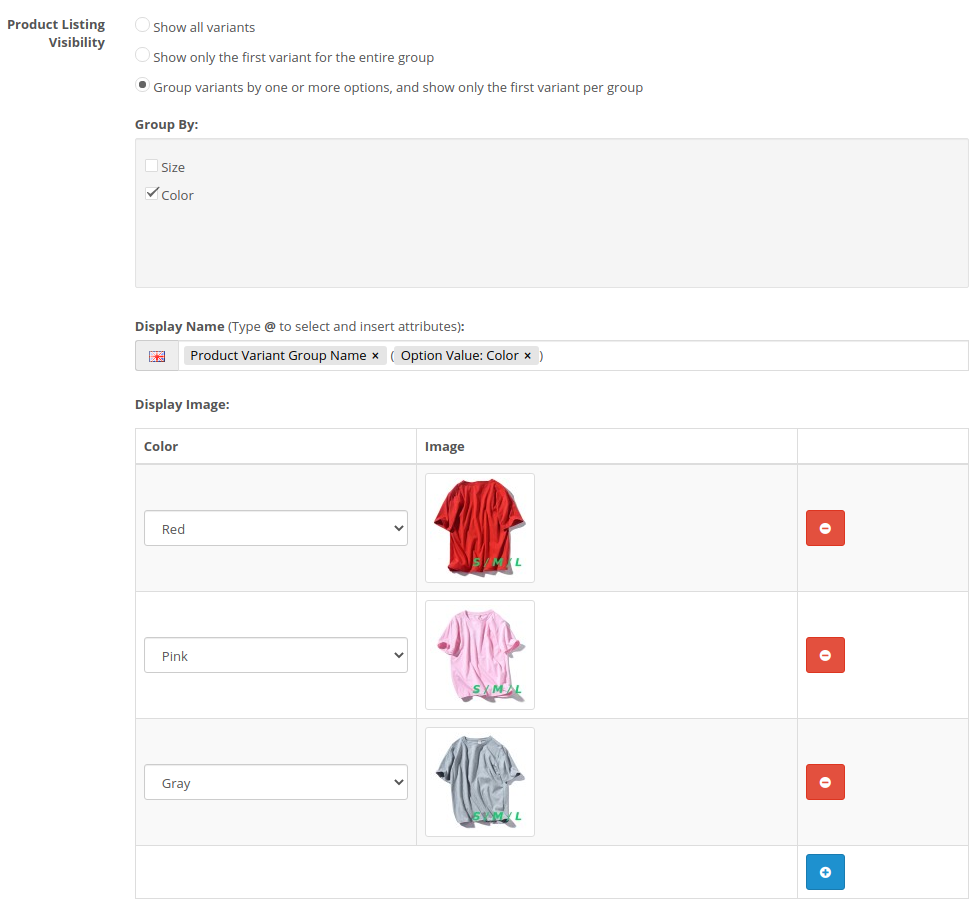
- The Display Name will be the name of the Product Variant Group followed by the option value for Color (between parenthesis).
- For Display Image, we choose images that represent their respective color variations.
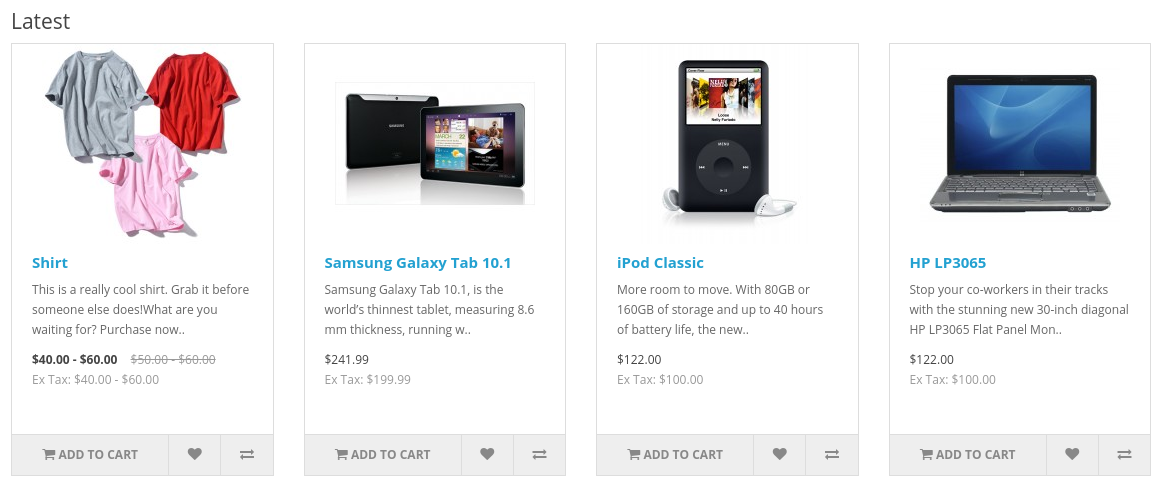
Now, when you visit our store, the product listings should appear like this:

If your variants have different prices, a price range will be displayed instead of a single price. The extension collates the product data across the variants and displays it in a meaningful way. You can find more information on this in Section 10.
Add to Cart / Wish List / Compare Buttons
When an item in a product listing represents multiple variants, clicking the Add to Cart, Add to Wish List or Compare Product button for the item will bring up a modal dialog asking the customer to choose a variant:
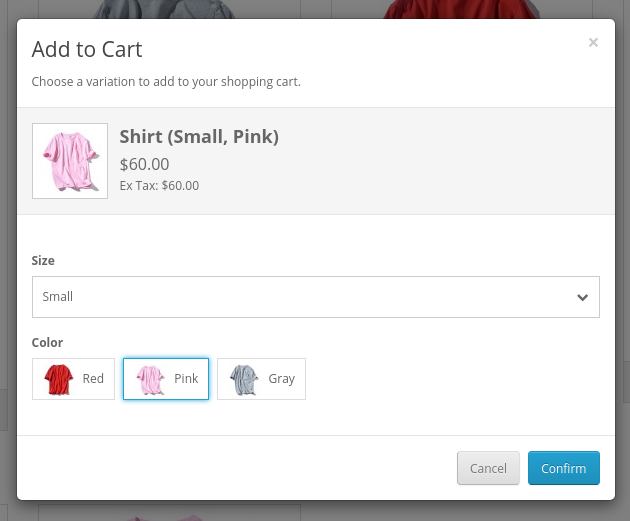
The customer would then click the Confirm button to perform the target action on the chosen variant.
7. Extension Settings
To access the extension settings, click the button on the Product Variants page.

Cache
Caching saves results of database queries so subsequent loads will be faster. It is recommended that you set this to Enabled for all stores, and disable it only when you need to debug a problem.
Product variant data is cached when it is first obtained. This implies that, for variants that have not yet been cached, the customer would have to wait for the data to be fetched first. The Build button allows you to prebuild the cache and ensure optimal response times for client requests because the variant data would already be available in the cache when needed.
The Build cache function will not rebuild cache entries for variants that have already been cached. To rebuild the entire cache, click the Clear Cache button to clear it first.
Maintenance Mode
When Enabled for a store, the extension will be disabled for customers of that store, i.e. they will just see the default product pages. If you have this setting enabled for the Default Store, the extension will run as usual if you are logged in as Administrator (Default Store only — this is a limitation due to OpenCart's session handling). This allows you to hide your work-in-progress from customers when working with the extension, and only show the results when you're done.
Preserve Data on Uninstall
If set to No, all Product Variant Groups and variant data will be deleted when you uninstall the extension. Set to Yes if you don't want data to be deleted.
The products, options and option values themselves will not be deleted. Note that if you choose to preserve data on uninstall, and plan on reinstalling the extension later on, you should ensure that products belonging to a Product Variant Group prior to uninstallation will not be deleted. Otherwise, you will encounter data inconsistencies when you reinstall the extension. The same goes for options and option values that have been assigned to products in a Product Variant Group. If you do not want those products to show up in the store, you should disable them instead.
SEO
Product variants generally contain near identical information such as description and attributes. When indexing the product pages for these variants, it is possible that search engines may see them as duplicate content and therefore lower their overall SEO ranking. To avoid this, enable the Canonicalise Links setting. The extension will set the canonical link of the product variants to the URL of the first variant in the group. This tells search engines that the product variants closely resemble one another, with the first variant being the "primary" version.AJAX Switch Handler
Switch handlers provide a means to switch between product variants without having to load the entire page. To put it simply, when you click on a swatch label, the switch handler fetches data for the corresponding product through AJAX calls and updates the relevant parts of the product page. This allows for a smooth user experience as the entire page is not refreshed. Switch handlers also support prefetching of product data, so certain information may be updated immediately without having to wait for a response from the server.
Note that switch handlers are theme-specific. The extension comes with a switch handler for the Default OpenCart theme, but if you are using a different theme then you would most likely have to implement your own switch handler. In this regard, you may wish to refer to the Switch Handler Framework documentation included in the extension's package (in the doc/dev directory).
The amount of effort required to implement a switch handler depends on the complexity of the theme. A good understanding of PHP, HTML and JavaScript is strongly recommended.
Modal Text
This configures the text that is displayed in the modal dialog that appears when the customer clicks the Add to Cart, Add to Wish List or Compare Product button for items that represent multiple variants in a product listing. You can change the dialog title and message here.
Template
The template settings allow you to control certain aspects of how the extension is displayed on the product page. Each store has its own settings.
Image Size
Specifies the size of images, if any, shown inside the swatch labels.Placement
Controls the placement of the swatch labels:
| Input Field | Explanation |
| Inside |
A jQuery-style selector that points to the container element for the swatch labels. If blank, defaults to body.
Using the OpenCart default template as an example, if we would like the swatch labels to be displayed inside a <div> element with id "product", the selector would be div#product. |
| @Offset / Before / After |
Specifies where to display the swatch labels within the parent node element:
|
Custom CSS
Here you can specify your own styles to override those provided by the store's theme (or the default theme if the store's theme does not contain the relevant CSS file). You can click Import from theme to see what styles are in use and make changes to your liking.
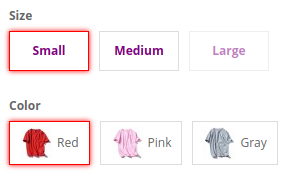
For example, to add a red glowing border to the dropdown and change the highlight color of selected swatch labels to red, we would enter the following in the Custom CSS field:
        .ga-product-variant .swatch ul li a.selected,
.ga-product-variant .dropdown .ga-pvov-dt {
  border-color: #ff0000;
  -webkit-box-shadow: 0px 0px 5px 0px #ff0000;
  box-shadow: 0px 0px 5px 0px #ff0000;
}
This is what you will see when you refresh the product page for Shirt (Small, Red):
8. Styling Swatch Labels and Dropdowns for Individual Options
In the previous section, we added some Custom CSS under the extension settings to change the appearance of the swatch label and dropdown elements. The CSS is applied to these elements irrespective of the option being displayed. So, if we change the display of the Size option to Swatch Label, we will see the following:
As you can see, our custom CSS has been applied to the swatch labels for both the Size and Color options. On the other hand, if we want to apply additional styling to the Size labels while keeping the Color labels unchanged, we would need another approach.
In Step 3.1 of Section 4, where we prepared the Product Variant Group for our shirt variants, we briefly mentioned the CSS Classes setting that is available for each option assigned to the group. We will use this setting together with the extension setting's Custom CSS field to provide additional styling for the Size labels.
Step 1: Add CSS class in Extension Settings
In extension settings, add the following to the Custom CSS field:
        .ga-product-variant .swatch.purple-text .ga-pvov-name {

          color: purple;

          font-weight: bold;

        }
This defines the CSS class to be applied to the Size labels. We have named our class purple-text and it applies only to swatch label elements (.swatch.purple-text).
Step 2: Specify CSS class in Product Variant Group
Edit the Shirt Product Variant Group. In the CSS Classes field for the Size option, type purple-text followed by Enter.

Save the Product Variant Group and visit the product page for one of the shirt variants. The swatch labels now appear as follows:
You can specify multiple classes in the CSS Classes field — just remember to press Enter after typing the name of each class.
Built-in CSS Classes
The extension provides a few built-in classes. In the CSS Classes field, typing @ will bring up the list of built-in classes you can choose from:
| Class | Description |
no-text |
Hides the text of the element. |
round-img |
Shows a rounded image. |
round-swatch |
Shows a rounded swatch label (as the name implies, this class only applies to swatch labels). |
no-padding |
Shows element with no padding. |
show-tooltip |
Shows tooltip when mouse hovered over element. The tooltip contains the text of the element.
This class does not style the element itself, but acts as a selector for the extension's template to identify elements that require tooltips to be displayed. |
Let's use some of these built-in classes to style our Color swatch labels. We want the labels to show a solid color, so the first step would be to edit the Color option and set images for the option values:
Next, edit the Shirt Product Variant Group and configure the Color option as follows:

Remember to set Image to Option Value. Then save the Product Variant Group and visit the product page for one of the shirt variants:
Because we have included the show-tooltip built-in class, a tooltip appears when the mouse hovers over a swatch label under the Color option:
9. Optional Read: GA Product Variants Extension vs. Direct Option Assignment
With the GA Product Variants extension, you create multiple products, put them in a Product Variant Group and assign options and option values. You may be wondering: why go through this trouble when you could just assign those options and option values to a single product?
To explain the drawbacks of doing this, let us go back to our shirts example. Instead of using the extension to group individual shirt products together, let us just assign the option values for the Size and Color options to a single shirt product.
Problem 1: Inability to specify exactly what variants are available
In our example, you will see there are no Medium + Gray and Large + Red shirts. Customers would not know this, though. In default OpenCart, if customers choose either Medium + Gray or Large + Red, they will still be able to add the product to their cart and checkout successfully!
OpenCart assumes all option value combinations are valid and available for purchase which, as we have seen, is not always the case. With our extension, you specify exactly what variations there are, so you won't have to worry about customers buying a product that doesn't exist.
Problem 2: SKU for products only, not Options
Many shops manage inventory through a unique stock keeping unit (SKU) assigned to each product. Other shops may use other unique properties like MPN or ISBN. This is particularly useful when your inventory is large and you need to do regular batch updates such as revising prices and stock levels.
Suppose we want to manage inventory this way for our shirts, i.e. a Small + Red shirt would have one SKU, while Medium + Red would have another, and so forth. But, if you assign these option values to a single shirt product, where do you specify the individual SKUs? Answer: you can't, because in OpenCart you can only assign an SKU to the product itself.
Since the extension requires each variant to be a single product, you can have a unique SKU for each of the variants and manage their inventory in the same way as you would for the rest of your products.
Problem 3: Inability to specify exact price and quantity for each variant
In OpenCart, you can set a price difference and quantity for each option value assigned to a product. This is probably fine when you have only one option in place. But when a variation is based on multiple options, such as our shirt which has size and color, what price difference and quantity should you specify for each option value to ensure that a particular variation will give the correct price and stock status?
With our extension you will not have to deal with this problem. Since each variation is represented by a product, you simply edit the product to set its price and quantity (or even a discount if you wish).
Problem 4: Same image(s) regardless of selected Option Values
In our shirts example, we have 2 images representing each color, making up 6 in total. If we use a single product to represent all the variations, then all 6 images will appear on the product page. This is not a big deal when we only have 3 colors. But what if we have 10 colors and want to show 3 images for each of them? That would result in 30 product images being shown on a single product page. Furthermore, the images will not change to reflect the selected variation, so customers would have to find out for themselves which images belong to which variation. From the customer's perspective, this could be both unappealing and unprofessional.
With our extension, each variation is represented by a product with its own images. Customers will therefore only see images that are relevant for the chosen variation.
Assigning options directly to products may still be useful in some cases, especially when those options do not relate to the product's inherent characteristics or features. For example, you could have a gift wrapping option for our shirts. This kind of option has no bearing on the shirt being viewed — it simply adds information about the customer's order.
10. Additional Notes
Deleting products
When you delete a product that belongs to a Product Variant Group, the product will automatically be removed from the group.
Deleting Options and Option Values
In OpenCart, you cannot delete an option if it is currently assigned to a product. Similarly, the extension prohibits you from deleting an option that has been assigned to a Product Variant Group.
In addition, the extension disables the Remove button for option values that are currently in use by product variants.
Editing Options
When you edit an option that is currently assigned to a Product Variant Group, its type will be restricted to Select or Radio, because these are the only types that can be used with the extension.
Product Listings
When multiple variants are displayed as a single item in a product listing, the extension displays information as follows:
- If the variants have different prices, a price range is displayed. Specials are shown as such only when at least one of the specials is lower than the maximum price among the variants.
- Where a rating is shown, the extension takes all the average ratings given to the variants and displays the average of them. For example, if product A has an average rating of 4 and product B has an average rating of 2, then the product listing will show a rating of 3.
Searches
The extension does not modify how OpenCart performs its searches. This means the Display Name specified under Product Listing Visibility is not included in the data searched.
Areas applied
The Product Listing Visibility setting is applied to product listings in the following areas of OpenCart:
- Featured, Latest, Bestseller and Special modules
- Specials page
- Related products
- Search results
- Category pages
- Manufacturer info pages
- Journal 3 products and side products modules
- Journal 3 search AutoSuggest list
Product Listings under the Journal 3 Theme
With the Journal 3 theme, you have the option of displaying extra information in the product listings. The extension caters for this as far as possible:
- Information that depends on product quantity, such as "In Stock" labels, take into account the maximum quantity among the variants.
- Information that depends on zero quantity is displayed only when all variants have zero quantity.
- "Out of Stock" status labels are only displayed when all variants have zero quantity and have the same Out of Stock status.
- For "Special" product labels, the extension calculates the "percentage off" value for each variant with special price. If the "percentage off" values are different, the product label text will be set to the maximum "percentage off" value prepended with "Up to".
- Product "Stat1" and "Stat2" labels are only displayed when the values underlying the labels are the same across the variants. For example, if the "Stat1" label is set to show the product SKU, but product A and product B have different SKUs, then this label will not be displayed. On the other hand, if the "Stat2" label is set to show the manufacturer name, and product A and product B both have the same manufacturer, then the "Stat2" label will be displayed.
- Product countdowns are only displayed if all the variants have specials and have the same Date End configured for them.
- If you have a product label configured for a specific product, and that product happens to be the first variant in the group, then the label will be displayed regardless of whether it actually relates to the other variants.
Changelog
Version 1.2.2_oc3
-----------------
Changed:
- Better compatibility with SEO modules

Fixed:
- Theme-specific stylesheets not loaded
- Variant option values in product form get reset if validation fails
- Save error when no CSS specified for variant group option in product form


Version 1.2.1_oc3
-----------------
Added:
- SEO setting
- Product Variant Group option CSS class setting

Fixed:
- Journal 3 stat not showing in some product listings
- Database connection timeout during long-running build cache
- Switch handler image sometimes not swapping


Version 1.2.0_oc3
-----------------
Added:
- Option Value display setting (swatch label / dropdown)
- Product Listing Visibility setting
- Build cache function
- Compatibility with OC 3.0.3.6

Changed:
- Products are now sorted under each group in the Product Variant Group list

Fixed:
- Switch handler: include reward points in price data
- Fix error in copy product variant group
- Other minor fixes


Version 1.1.0_oc3
-----------------
Added:
- Switch handler
- Image size setting

Changed:
- Handle multiple comma-separated selectors for template placement (before/after)

Fixed:
- Fix options / option values not appearing when db prefix is empty
- Fix error when options / option values contain quotes
- Other minor fixes

v1.0.0_oc3
----------
- Initial release for OpenCart 3